
I recently decided to re-build my personal blog/website (this very site) from the crumbled ashes of my previous attempts some years earlier. I’ve almost always gone to WordPress for this kind of thing - I’ve done enough years of WordPress administration to know that its a great piece of software.
But WordPress is also a large piece of software, and its functionality seems overkill for my basic needs. Not to mention the fact that it is natively not the quickest, and generally needs caching software to make it performant.
What I needed for my website was really just a static HTML site - but with the single complication of wanting to be able to write blog posts. This lead me to discover Jekyll, which, after a bit of research and deliberation, seemed to fit my needs.
Jekyll is a Ruby application which takes individual pages and blog posts written in HTML or Markdown, and ties them all together into a static HTML site using a layout of your choice. In other words, to write a blog post I just have to write a basic markdown file with some text in it, and Jekyll will do the rest - put it into a page on my website, link to it from all the right places, etc etc.
I also wanted to automate this where possible - the likes of WordPress have an easy web editor. That’s not something we get here, as we’re just working with files, so realistically I’ll be using text editing software to write blog posts and build the website.
I settled on the below as a plan for how I would make publishing to my new website as easy as possible:
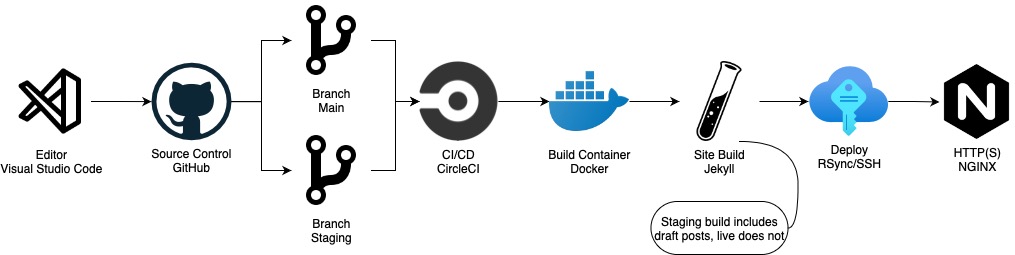
The goal is to be able to use VS Code on my MacBook to edit my blog, and all I need to do is commit & push to GitHub when I make changes - the site will then be updated accordingly.
Building Site Structure
Roughly speaking Jekyll uses the following structure:
    _drafts/
        |___Draft-Blog-Post.md
    _includes/
        |___header.html
        |___footer.html
    _layouts/
        |___default.html
        |___post.html
    _posts/
        |___2021-07-15-Published-Blog-Post.md
    _config.yml
    index.html
Most of the site HTML goes in the header.html and footer.html includes. This gives us the basic structure of the site. The _layouts/ folder then contains a ‘type’ of page or post for example. I’ve gone for default (homepage) and post (blog posts).
Then, at the top of each markdown or HTML file, you simply start the file with the following:
    ---
    layout: post
    title: This is my blog post
    excerpt: A blog post about things and such
    ---
…and put your content underneath. Jekyll will do the rest, creating static HTML pages for your blog posts, homepage, etc, showing a list of your blog posts where you have chosen to do so.
I won’t go into further detail around my Jekyll setup, it really is super simple, and Jekyll have great documentation so it’s easy to get started.
Deployment Flow in GitHub & CircleCI
I wanted to avoid having to log in and run jekyll build every time I updated the site, so I figured I’d use CircleCI to run this part for me.
Provided the code is in GitHub, its easy to set up a CircleCI project to go with it. I can log in with GitHub and set up a config file that looks something like this:
version: 2.1
jobs:
    build-live:
        docker:
            - image: jekyll/jekyll:latest
        steps:
            - run:
                name: dependencies-live
                command: |
                    apk update;
                    apk add rsync openssh-client
            - checkout
            - run:
                name: build-live
                command: |
                    jekyll build
            - run:
                name: deploy-live
                command: |
                    rsync -avz --delete -e 'ssh' --omit-dir-times --exclude='.git/' --exclude='.gitignore' --exclude='.circleci/' _site/. circleci@mywebserver:/path/to/live/site/;

    build-staging:
        docker:
            - image: jekyll/jekyll:latest
        steps:
            - run:
                name: dependencies-staging
                command: |
                    apk update;
                    apk add rsync openssh-client
            - checkout
            - run:
                name: build-staging
                command: |
                    jekyll build --drafts
            - run:
                name: deploy-staging
                command: |
                    rsync -avz --delete -e 'ssh' --omit-dir-times --exclude='.git/' --exclude='.gitignore' --exclude='.circleci/' _site/. circleci@mywebserver:/path/to/staging/site/;

workflows:
    do-build:
        jobs:
            - build-live:
                filters:
                    branches:
                        only:
                            - main
            - build-staging:
                filters:
                    branches:
                        only:
                            - main
                            - staging
So we have 2 build sequences in our CircleCI config; one for live and one for staging. These are mostly identical, using the Jekyll Docker image (the same one you can use to run the website) to build the files, then using rsync to copy the files to my nginx server via SSH.
One noteworthy difference between the live and staging build sequences, is that in staging we run jekyll build --drafts. The –drafts flag tells Jekyll that this is a staging site, so it should include blog posts in the _drafts folder, not just the ones that have been published with a date.
Creating & Updating
The only other thing that’s needed to make this work is something to serve the files.
I’m using nginx for this; I won’t go into the details because it is really just a bog standard nginx config, pointing to the directory where my CircleCI workflow moves the Jekyll files.
There are many options for how to serve this content, ultimately it is static HTML so it can be kept pretty simple. Sticking the files in a bucket on your favourite cloud provider™ would be one, or even using GitHub Pages, which will host Jekyll free of charge.
With all this set up, updating the blog is simply a matter of editing the component HTML or Markdown files, and committing to GitHub. The site will then be updated within a minute.
Limitations
Keeping things this simple isn’t without its limitations of course.
The main thing I feel is missing right now is the ability to comment on blog posts - this is something that does have a number of plausible options, but I’ve not yet put aside the time to investigate these. If I do find a suitable solution, I’ll update this blog post to reflect this.
Update January 2022: I have now added commenting to this blog using Staticman. I have written a follow-up post here on how I achieved this.
Thanks for reading!
Comments are turned off for this post, but please do get in touch directly if you've any comments or questions.