
Last year I wrote about how I built this site and its associated blog functionality using Jekyll and a bunch of other tools.
One of the noted limitations at the time was that I wasn’t able to offer commenting on my blog posts. Instead, I put some text at the bottom of the blog post template file, which invited readers to contact me directly with any feedback or suggestions on my scribblings.
I never wanted this to be a permanent solution, and recently I finally got around to implementing comments.
Why Staticman?
I looked at a number of different solutions. Perhaps the most well known is Disqus, which has been around for years, and I understand is pretty easy to implement, with a bit of code you can add to any page to include their commenting widgets.
For those in search of an easy life, Disqus certainly seems a good solution. However, as a commercial product it is not without its downsides - the price isn’t the cheapest if you don’t want ads on your site, and I also felt it was a little ‘heavy’ a thing to load in the browser - part the reason for having a static site is keeping it fast and page ranks high, and I didn’t want commenting to be a detriment to this.
Among other solutions I found Staticman, which stood out to me as the closest thing to what I needed, added to which it is designed to work with a Jekyll site exactly like mine. Dreamy.
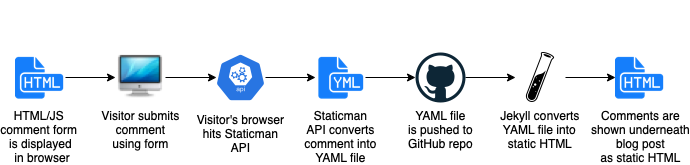
How it works
Staticman works by providing an API endpoint which can be called from the visitor’s browser. The API takes details of the comment and the post to which it relates, and converts this information into a YAML file. This YAML file is then pushed to the GitHub repository for the main Jekyll site. Jekyll can then be configured to simply see these files like it does blog posts or pages - just another section of content to be processed into static HTML.
Staticman Architecture
As you can see from the above diagram, Staticman slots nicely into the existing deployment process for this blog (all changes into GitHub get pushed to CircleCI which runs the Jekyll build commands and deploys to my web server).
In the early days of Staticman it was exceptionally straightforward to use, since you would just configure your website to hit their hosted API. Sadly, since its popularity resulted in GitHub limits being hit, it can now only be self-hosted. This did make me think long and hard about whether it was the right solution; since having to run additional infrastructure would seem to go against the reason I wanted a static blog in the first place.
Staticman do try to mitigate this by making it as easy as possible to deploy. It is a NodeJS application, but can be spun up pretty easily using Heroku (Staticman’s recommended approach if you’re not used to running applications) or Docker. I imagine it would also be relatively straight forward to deploy as an API using your favourite cloud provider™.
I opted for the Docker image, since I already run Docker hosts and had some spare capacity to run an additional container for Staticman.
Step 1 - Creating a GitHub Application and Deploying Staticman
Whether you opt for a simple NodeJS runtime, or using Heroku or Docker, it is pretty simple to get Staticman up and running, because most of the configuration is handled in the remote repository.
You’ll first need to set up a new GitHub application and link it to your repo. This is a fairly standard process but is covered in enough detail in the Staticman Getting Started page.
Once you’ve got your App ID and private key, you have all you need to run Staticman.
I used the following docker-compose.yml:
version: '2'
services:
  staticman:
    build: .
    env_file: .env
    ports:
      - '3000:3000'
    restart: unless-stopped
    environment:
      NODE_ENV: production
      PORT: 3000
      GITHUB_APP_ID: 000000
      GITHUB_PRIVATE_KEY:
      RSA_PRIVATE_KEY:
All that’s needed is to swap in your GitHub App ID and Private Key. The RSA_PRIVATE_KEY field is a separate key which you can generate yourself, and is used for encrypting Staticman settings in your repo config file (which could be public).
These fields are just set as environment variables - if using Heroku you will need to find the settings for your app in the Heroku dashboard and set the environment variables from there.
That’s really all the config you need for Staticman server-side. The rest is done in your repo and handled dynamically by your Staticman instance.
Step 2 - Configuring Staticman in your Repo
The requests you end up making to the Staticman API will tell it which repo to connect to (it will need to be one to which your GitHub App ID has access).
We don’t need to worry about making requests to the API just yet, but we do need to configure Staticman for our repo. This is done using a file called staticman.yml.
# Production (main)
comments:
  # Which Git Branch should Staticman push comments to
  branch: "main"
  # Which fields may be submitted? Any request with extra fields will be rejected.
  allowedFields: ["name", "email", "url", "message"]
  # Which fields are required? Any request missing any one of these will be rejected.
  requiredFields: ["name", "email", "message"]
  # How should we describe the commit from Staticman
  commitMessage: "New comment added on blog post"
  # Format of file - e.g. this might call the comment file entry1641558066969.yml
  filename: "entry{@timestamp}"
  format: "yaml"
  # Adds a timestamp field to every comment
  generatedFields:
    date:
      type: date
      options:
        format: "timestamp-seconds"
  # If set to true, we will receive a Pull Request in GitHub for every new comment
  moderation: false
  # Name of site
  name: "henrycole.uk"
  # Optional: Allowed cross-origin domains
  allowedOrigins: ["localhost", "henrycole.uk"]
  # Relative path where we should store comments - the 'slug' we will send to the API as the name
  # of the commented page
  path: "_data/comments/{options.slug}"
  # Store emails as md5 - this is how Gravatar accepts emails, and avoids storing plaintext emails
  # of our site visitors in a public repo
  transforms:
    email: md5
I’ve commented the above especially for this post. I actually suggest you start with the sample config from Staticman, and be sure to read their full config reference for all the options you can use.
Essentially, this config file boils down to:
- Which branch is this config for?
- What fields do we want (or not) on comments?
- Where and how should we store these comments?
Step 3 - Adding Comments to Your Site
We now have an API running which, given the right parameters, will convert our API request into a file, then push that file to our repo. That leaves 2 bits missing:
- Jekyll won’t yet do anything with those comment files
- We don’t have any means of website visitors submitting a comment
To tackle point one, we need to be somewhat familiar with how Jekyll & Liquid build pages.
In my case, I have a layout called post.html, which calls includes of header.html and footer.html. This layout is used by Jekyll for each markdown file in my _posts directory, because these include layout: post at the top of the page. So _layouts/post.html is the standard template for a blog post, that seems like a good place for us to start adding comments.
To keep things somewhat modular, I then created a new file in ‘_includes’ called post_comments.html. I simply call this at the bottom of my post.html template with {% include post_comments.html %}. Great, we now have every blog post including a comments file.
In post_comments.html, we can then write some code to check if we have comments on this post:
_includes/post_comments.html
      {% if site.data.comments[page.slug] %}
        <div id="comments">
          <h3>Comments</h3>
          {% assign comments = path | sort %}
          {% for comment in comments %}
            {% assign email = comment[1].email %}
            {% assign name = comment[1].name %}
            {% assign url = comment[1].url %}
            {% assign date = comment[1].date %}
            {% assign message = comment[1].message %}
            {% include comment.html index=forloop.index email=email name=name url=url date=date message=message %}
          {% endfor %}
        </div>
      {% endif %}
This part is fairly straightforward, we are firstly checking if there are comments files associated with the page in question. If there aren’t; we can assume it has no comments and we don’t need to worry about displaying anything. But if there are, we firstly display a heading, then we iterate through each comment file for this post, and for each one we include another file, ‘comment.html’, which will display that individual comment. Note how we pass the comment data as variables when we include comment.html.
In comment.html we then need to handle these variables and display them however we want. My site uses Bootstrap, so the styling is using Bootstrap’s classes. You’re welcome to use this if you also use Bootstrap, otherwise you simply need to add your relevant styles for these elements.
_includes/comment.html
<article id="comment{{ include.index }}" class="js-comment comment card m-4" itemprop="comment" itemscop itemtype="http://schema.org/Comment">
    <div class="container mt-3">
        <div class="row">
            <div class="col-2 col-md-1">
                <img src="https://www.gravatar.com/avatar/{{ include.email }}?d=mm&s=50" srcset="https://www.gravatar.com/avatar/{{ include.email }}?d=mm&s=100 2x" alt="{{ include.name }}" height="50" width="50">
            </div>
            <div class="col">
                <h5 class="card-title" itemprop="author" itemscope itemtype="http://schema.org/Person">
                    {% unless include.url == blank or include.url == "" or include.url == nil %}
                    <a rel="nofollow" href="{{ include.url }}" class="text-decoration-none text-reset"><span itemprop="name">{{ include.name }}</span></a>
                    {% else %}
                    <span itemprop="name">{{ include.name }}</span>
                    {% endunless %}
                </h5>
                <h6 class="card-subtitle mb-2 text-muted">
                    {% if include.date %}
                    {% if include.index %}<a href="#comment{{ include.index }}" itemprop="url" class="text-decoration-none text-reset">{% endif %}
                    <time datetime="{{ include.date | date_to_xmlschema }}" itemprop="datePublished">{{ include.date | date: "%B %d, %Y at %I:%M %p" }}</time>
                    {% if include.index %}</a>{% endif %}
                    {% endif %}
                </h6>
                <p itemprop="text" class="card-text">{{ include.message | markdownify }}</p>
            </div>
        </div>
    </div>
  </article>
As you can see, comment.html is mostly HTML to display our individual comment. It includes the following logic however:
- An ‘index’ added to the HTML element ID, so we can link directly to this comment.
- A profile picture for the visitor which comes from Gravatar based on their email address (Gravatar will return a placeholder image if they do not have one).
- Some logic to check if the visitor left a URL; if they did then link their name to their URL.
- Conversion of the timestamp of their comment into a human readable time that the comment was left.
That’s it! We now have everything we need for Jekyll’s build process to pick up the comment files and display each of these under the associated blog post.
All that’s left to do now is set up our form for leaving a new comment. For this I’m using the same ‘post_comments.html’ include file as earlier, since this is included at the bottom of every post:
_includes/post_comments.html
<!-- Leave a Comment Form -->
<h3>Leave a Comment</h3>
<p>You can leave a public comment below, or alternatively <a href="/#contact" class="text-decoration-none text-muted">get in touch with me direct</a> if you'd prefer.</p>
<form id="comment-form" method="post" action="{{site.staticman.base_url}}/v2/entry/{{site.staticman.git_provider_username}}/{{site.staticman.repo}}/{{site.branch}}/comments{% if site.branch != "main" %}-{{ site.branch }}{% endif %}">
    <div class="mb-3">
        <fieldset>
        <label class="form-label" for="comment-form-name">Name</label>
        <input class="form-control" type="text" id="comment-form-name" name="fields[name]"/>
        </fieldset>
    </div>
    <div class="mb-3">
        <fieldset>
        <label class="form-label" for="comment-form-email">Email address</label>
        <input class="form-control" type="email" id="comment-form-email" name="fields[email]"/>
        </fieldset>
    </div>
    <div class="mb-3">
        <fieldset>
        <label class="form-label" for="comment-form-url">Website (optional)</label>
        <input class="form-control" type="url" id="comment-form-url" name="fields[url]"/>
        </fieldset>
    </div>
    <fieldset class="hidden" style="display: none;">
      <!-- used by Staticman to generate filenames for each comment -->
      <input type="hidden" name="options[slug]" value="{{ page.slug }}">
      <!-- honeypot used to filter out spam -->
      <label class="form-label" for="comment-form-location">Not used. Leave blank if you are a human.</label>
      <input type="text" id="comment-form-location" name="fields[hidden]" autocomplete="off"/>
    </fieldset>
    <div class="mb-3">
        <fieldset>
            <label class="form-label" for="comment-form-message">Comment</label>
            <textarea class="form-control" type="text" rows="3" id="comment-form-message" name="fields[message]"></textarea>
        </fieldset>
    </div>
    <div class="mb-3">
        <fieldset>
        <button type="submit" id="comment-form-submit" class="btn btn-secondary">Submit Comment</button>
        </fieldset>
    </div>
  </form>
    <!-- Comment form response messages -->
    <div role="progressbar" id="comment-form-submitting" hidden><img width="50px" height="50px" src="/img/spinner.gif" style="display: inline;" alt="loading spinner" /></div>
    <div id="comment-form-success" class="alert alert-success" hidden>Thank you for your comment. It will be visible on this page in a few minutes' time.</div>
    <div id="comment-form-error" class="alert alert-danger" hidden>Sorry, there was an error with your submission.</strong> Please make sure all required fields have been completed and try again.</div>
The above is our HTML form for submitting a comment. There’s not much special about it, but a couple of things to note:
- It has a hidden field for Jekyll to inject the page ‘slug’ - this is what Staticman will use to ensure the comment is associated with the post on which it was left.
- It has a hidden ‘honeypot’ field. This is a small antispam measure, because in our Staticman config earlier we didn’t list this as an ‘allowed field’. So if a robot fills it in, Staticman will reject their entry as spam.
- In the final section we have a loading GIF, a success message and an error message. These are all hidden by default, but using JavaScript we can show these when it is pertinent to do so.
Here’s the JS I’m using to process this form:
_includes/post_comments.html
 <!-- JS to handle comment form submission via Staticman API -->
 <script>
    document.getElementById('comment-form').onsubmit = e => {
      e.preventDefault();

      let form = document.getElementById('comment-form');

      form.hidden = true;
      document.getElementById('comment-form-success').hidden = true;
      document.getElementById('comment-form-error').hidden = true;
      document.getElementById('comment-form-submitting').hidden = false;

      let formData = new FormData(form);
      let params = new URLSearchParams(formData).toString();

      fetch('{{site.staticman.base_url}}/v2/entry/{{site.staticman.git_provider_username}}/{{site.staticman.repo}}/{{site.branch}}/comments', {
        method: 'post',
        credentials: 'include',
        headers: {
          'accept': '*/*',
          'accept-language': 'en-US,en;q=0.9',
          'content-type': 'application/x-www-form-urlencoded',
        },
        body: params,
        mode: 'cors',
        credentials: 'omit'
      }).then(response => {
        if (!response.ok) {
          throw new Error('Network response was not ok:' + response.statusText);
        }
        document.getElementById('comment-form-submitting').hidden = true;
        document.getElementById('comment-form-success').hidden = false;
      }).catch(err => {
        console.log(err);
        document.getElementById('comment-form-submitting').hidden = true;
        document.getElementById('comment-form-error').hidden = false;
        form.hidden = false;
      });
    }
    </script>
The first thing worth noting here is the submission URL for Staticman in this line:
fetch('{{site.staticman.base_url}}/v2/entry/{{site.staticman.git_provider_username}}/{{site.staticman.repo}}/{{site.branch}}/comments', {
You could hard code this URL, but I chose to add the following to my Jekyll _config.yml:
_config.yml
branch: main
staticman:
  repo: henry-personal-website
  git_provider: github
  git_provider_username: hcuk94
  base_url: https://staticman.henrycole.uk
When these site variables have been injected into this JS by Jekyll, our submit URL will then look like this:
https://staticman.henrycole.uk/v2/entry/hcuk94/henry-personal-website/main/comments
You can now see how Staticman expects the repo details in the API URL, in order to know where to submit the comment.
Other than that, the flow of this JS boils down to:
- When the form is submitted, hide the form and show a loading spinner GIF to the user.
- Submit the comment to the Staticman API.
- If the API returns an error, log an error to the user’s browser console, and show the ‘error’ message on the form.
- If the API returns successfully, show the ‘success’ message.
This is pretty much all we need. We’ve now got the following:
- A Staticman instance running
- The relevant configuration files in our Repo
- The code in our blog to display comments and a form for posting a new comment
If you experience issues, you can use an API client such as Paw or Postman to troubleshoot the API endpoint direct. The logs from the Staticman API instance may help you too. I did encounter a couple of issues e.g. with getting the POST URL format exactly right, but after some fiddling was able to get there.
That’s all there is to it, but I’ve also included some optional extras below which you may want to consider.
Extras
Handling Multiple Branches
I have a staging site in addition to my public website, where I write draft posts and make changes to my site before putting them live. This exists as a ‘staging’ branch in the same repository, and when I implemented Staticman I wasn’t too sure how I should handle this. Staticman will always push new comments to a specific branch, so there’s some merging which will need to take place at some point whichever way you look at it.
However, I figured it would be useful to have the ability to comment on the staging site for when I needed to test the functionality. I decided I should have another folder, comments-staging, which will contain any comments for the staging site.
As part of my build process for the staging branch, I already replace _config.yml with _config.staging.yml, so I just need to change branch: main to branch: staging in that file.
In the staticman.yml config file, I add an additional block for the staging branch:
# Staging
comments-staging:
  branch: "staging"
  allowedFields: ["name", "email", "url", "message"]
  requiredFields: ["name", "email", "message"]
  commitMessage: "New comment added on blog post"
  filename: "entry{@timestamp}"
  format: "yaml"
  generatedFields:
    date:
      type: date
      options:
        format: "timestamp-seconds"
  moderation: false
  name: "staging.henrycole.uk"
  allowedOrigins: ["localhost", "staging.henrycole.uk"]
  path: "_data/comments-staging/{options.slug}"
  transforms:
    email: md5
We’re effectively telling Staticman to accept comments for this branch, and store them in the ‘_data/comments-staging/’ directory.
Then there’s some tweaks to do in our site code. In includes/post_comments.html we can add some logic to check the branch and fetch comments from the appropriate directory:
    {% if site.branch == "staging" %}
     {% assign path = site.data.comments-staging[page.slug] %}
    {% else %}
    {% assign path = site.data.comments[page.slug] %}
    {% endif %}
      {% if path %}
        <div id="comments" class="mb-4">
          <h3>Comments</h3>
          {% assign comments = path | sort %}
          {% for comment in comments %}
            {% assign email = comment[1].email %}
            {% assign name = comment[1].name %}
            {% assign url = comment[1].url %}
            {% assign date = comment[1].date %}
            {% assign message = comment[1].message %}
            {% include comment.html index=forloop.index email=email name=name url=url date=date message=message %}
          {% endfor %}
        </div>
      {% endif %}
There’s also some logic to be added to our API URL in our form & JS:
{{site.staticman.base_url}}/v2/entry/{{site.staticman.git_provider_username}}/{{site.staticman.repo}}/{{site.branch}}/comments{% if site.branch != "main" %}-{{ site.branch }}{% endif %}
And that should be it - we’ve configured our staging build to use a different branch name and directory name for Staticman, and configured our site code to handle this when posting/displaying comments.
Enabling/Disabling Comments per Post
I wasn’t sure if I necessarily wanted commenting to always be available on every post I write, so I figured I’d add a bit of logic to allow me to enable/disable it on a per-post basis. I decided to still show existing comments, but replace the comment form with some text inviting visitors to contact me directly if they have any feedback.
This is fairly simple to achieve, since Jekyll already has a properties header at the top of every post. I simply needed to add a property for comments, such as the below:
---
layout: post
title: Hello, World!
excerpt: My first blog post
comments: true
---
Then, in my _includes/post_comments.html file, I wrap the following around the form:
{% if page.comments == true and site.comments == true %}
    ... (html form) ...
{% else %}
<p class="text-center mt-3"><small>
  Comments are turned off for this post, but please do <a href="/#contact" class="text-decoration-none text-muted">get in touch directly</a> if
  you've any comments or questions.
</small></p>
{% endif %}
So we’ve simply added a check for the page.comments property being set to true, and only if that condition is met will we show the comments form.
If comments is set to false, or indeed if it is not set at all, we will show a message inviting visitors to contact me direct instead.
The 2nd check in the ‘if’ statement is for a site-level property called comments. This works in exactly the same way but is set in the _config.yml file. This means that we can turn off comments for the entire site - I figured this might be useful if I wanted to do maintenance on Staticman for example, as it would avoid presenting visitors with an error after they had written out a very thoughtful comment.
Security & Antispam
If you’ve been around the block when it comes to allowing comments on blogs, you might be thinking this all seems a little ‘open’ to the world, and you’d be right.
There’s a few things worth considering when it comes to security and spam prevention.
API Security
Staticman was originally designed to be run ‘as a service’ rather than self-hosted by individual blog owners, so the very nature of how it works allows you to use it across any repo on one of the supported services. To prevent others using your API in their own Repo, you’ll need to take some action depending on how you’re authenticating to your Git provider. I’m using GitHub, and I’m authenticating using option 1 detailed here. This means that I have an ‘application’ set up in GitHub which I’ve granted access to my repo. All I need to do to prevent others from using my API endpoint is to make my GitHub Application private. Once I’ve done that, no one else is able to grant it access and therefore use my key. So any API request will fail.
If using option 2 to connect to GitHub, you would need to make your ‘connect’ API endpoint inaccessible to the public so your API cannot be connected to new repos.
Anti-spam
Staticman comes with 2 inbuilt methods for helping combat spam; these are Akismet Antispam and reCAPTCHA.
Akismet is a well-known service if you’ve ever run a WordPress site before; it analyses comments and rejects potential spam. It is (usually) a paid service.
reCAPTCHA is Google’s CAPTCHA, which you will undoubtedly have seen before. To post a comment with this enabled, you’d need to select all squares with bicycles for example. It’s also very handy for confusing UK-based visitors by asking them to identify ‘sidewalks’. In the interest of not supporting the Google empire and being a privacy enthusiast I do recommend hCAPTCHA as an alternative, but sadly Staticman has not yet implemented hCAPTCHA.
Credits
I wanted to write this post to document my experience, as there were a couple of things I got stuck on (e.g. staticman.yml config sits in the remote repo, not in the app dir on the Staticman server!). I cannot claim to have figured this all out on my own though, as I have drawn on multiple excellent pages to help me get to this stage.
I drew a lot from this excellent post from MadeMistakes, which details their experience in a way that is far more conclusive than I’ve managed. The MadeMistakes approach used jQuery, which I wanted to avoid as I didn’t need it anywhere else on my blog, so this post from Joe Hendrix helped me with a native JavaScript solution for submitting the comment form. Last but not least, the Staticman documentation itself is of course very helpful, and if you’re serious about setting up Staticman for yourself, you should read it to understand all the configurable options available to you.
Also worth noting, MadeMistakes have posted a follow-up article which covers some extra things you can do such as threaded comments.
If you’ve read this far, thanks for sticking with me, and feel free to use the comments section below to try out the end result!

Comments
Xin Zhang
Hi Henry, did you self-hosted staticman? I didn’t find any clue in this post.
Henry Cole
Hi Xin Zhang, yes I run my own container hosts so using the docker-compose file in step 1, I have staticman running across 2 hosts, each with an nginx proxy in front for TLS etc. I believe Staticman recommended Heroku for hosting, but I’m not sure Heroku is free any more.
Xin Zhang
Hi Henry, thanks for your reply. Heroku isn’t free anymore. I have tried to deploy staticman on AWS Lambda. But, I’m still struggling with it … Here’s my post. Hope I can figure out how to make it work.